My Experience Setting Up an Anytime Mailbox
Posted by Grace on May 15, 2024
I've been using Anytime Mailbox for two years now. The setup experience hasn't changed much over that time. However, the process is a bit complicated, and I found myself scrambling to contact all the parties for the second time around. So, I decided to write down my experience to remember it for next year!
Anytime Mailbox is a virtual mailbox service that allows you to manage your postal mail online, offerin gmail scanning, forwarding, and virtual addresses in various locations worldwide.
If you find this article helpful, please consider using my promo code when you sign up for Anytime Mailbox.
Contents
- When to Use A Virtual Mailbox
- The Key Parties During Setup
- Set Up Anytime Mailbox & Mail Forwarding
- Use Anytime Mailbox
- Cancel Anytime Mailbox
- Conclusion
When to Use A Virtual Mailbox
If you run a business and have decided not to disclose your physical address to the public, you can rent a virtual mailbox.
If you travel extensively (i.e., for durations longer than one month), you should consider renting a virtual mailbox. For durations less than one month, you can request USPS to hold the mails for you.
If you travel and want to keep an eye on the paper mails that come in, virtual mailbox services often handle opening and scanning the content, allowing you to get notified as soon as possible.
The Key Parties During Setup
- You: the recipient of the mails.
- Anytime Mailbox: the virtual mailbox provider, which has contracts with many mail centers worldwide.
- Mail Center Operator: often the local physical mailbox provider that receives, stores, scans, and shreds the mails for you.
- USPS: the United States Postal Service, which forwards your mails from your original address to the mail center operators.
So many parties! I know! This is what makes the progress so complicated, unfortunately. But don't worry! I will explain them.
Set Up Anytime Mailbox & Mail Forwarding
1. Choose a Physical Mailbox Center that Works for You
A mailbox center is a physical store where your mails will be received, stored, and scanned upon request. Staff at the mail center will handle your paper mails. These mail centers are independent privately owned businesses.
To find one,
- Visit Anytime Mailbox.
- Search for mail centers by location.
When choosing a mail centers, consider these factors:
- Proximity: How far is it from you? You may need to pick up some mails later, so it may be important to have it closer to you.
- Number of Recipients: If you want your partner's mail delivered to the same mailbox, choose an option that can include multiple recipients.
- Pricing: Different locations offer varying prices for the same service level.
- Reviews and Ratings: Mail centers are typically private mom-and-pop shops, so check Google Maps for reviews. Are they responsible? Is their customer service good?
Pro-tip: In the location search results, you can view the price for the lowest tier of each location. Beware! Some mail centers display a low price to attract users, but if you opt for a higher tier (e.g., because you need two recipients), their price for that tier may not be the cheapest anymore. I have seen some mail centers do that. Be cautious!
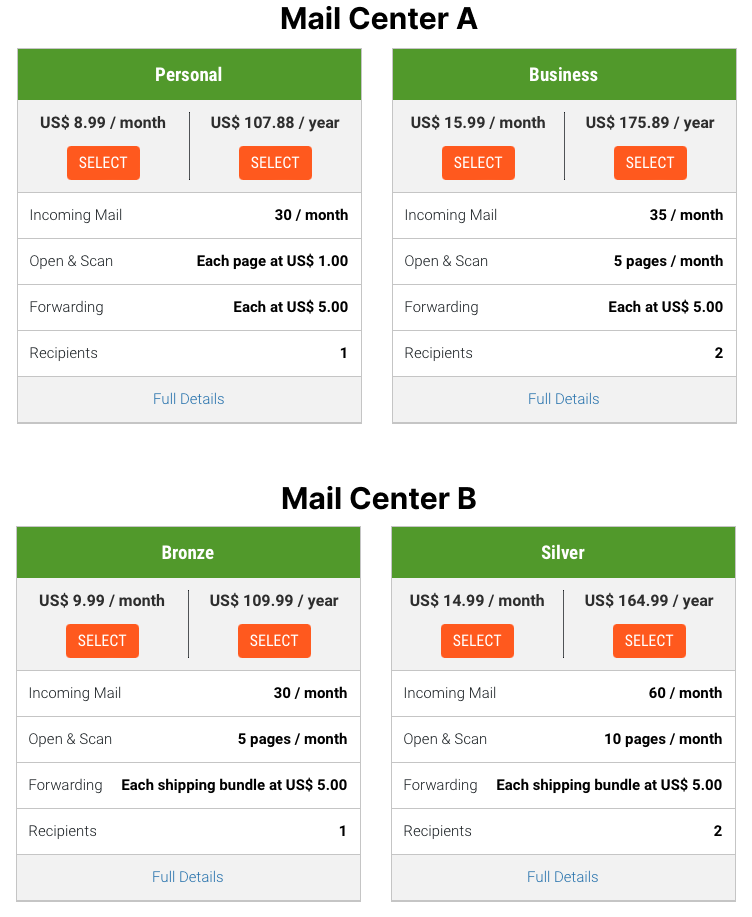 Which one would you choose, between Mail Center A and Mail Center B?
A is cheaper for one recipient but more expensive for two recipients, and it also allows fewer incoming mails. On the other hand, B is more expensive for one recipient but cheaper for two recipients, and it allows more incoming mails.
At the end of the day, these mail centers are independent private businesses. They have the freedom to charge what they choose.
2. Sign up
- Once you've found the ideal mail center, you can begin the sign-up process. The required information is standard.
- Choose a mailbox number at that location.
- Pay for the mailbox in full for one month.
By the end of this step, you should have a mailbox assigned to you, but it won't be activated until your paperwork is approved.
However, as soon as your payment goes through, your subscription begins, even though your mailbox is not activated. You will need to submit the paperwork, and then it will take an additional 2-3 days for activation. Plan accordingly.
3. Prepare the Paperwork
You will need three things to submit your application to activate your mailbox:
- Your photo ID
- A secordary ID to prove your address
- A notarized USPS Form 1583
You can find the details about the IDs and the form here.
The USPS Form 1583, or Application for Delivery of Mail Through Agent form, is a document that authorizes a Commercial Mail Receiving Agency (CMRA) to handle and receive mail on a customer’s behalf.
For the two forms of IDs, you can use your phone to scan them and upload them to your account on the website.
For the notarized form, you have two options:
- The Online Notarization service that is offered within Anytime Mailbox. (Cost: $25)
- You can download a pre-filled USPS Form 1583 with your information, print it, and have it notarized by a certified notary. (Cost: Free or Paid)
I have used both options in the past. The first one was super fast: you can get it notarized within minutes. The second option saves money because I found that my bank can provide notary services for free.
For the second option, after the form is notarized, scan it and upload it to your account. Now your application will show as "pending."
4. Get Approved by Anytime Mailbox and the Mail Center Operator
At this point, your application to activate your mailbox is pending for approval. It will need to be approved first by Anytime Mailbox, then by the physical mail center operator.
Pro tip: To expedite the approval process, call the contact phone number of Anytime Mailbox, and they can immediately review your application and approve it over the phone if everything looks good.
Once it is approved, pick up the phone and call your mail center operator. You can find their phone number under your account. Depending on how responsive they are, talking to them most of the time moves things faster.
Once the mail center operator approves, you are all set. The mailbox is now activated.
5. Add Additional Recipient(s)
(If you don't want to add more recipients, skip this step.)
Even if you have purchased a multi-recipient plan, at this point, you have only set up one recipient for this mailbox.
To add an additional recipient, they need to submit the same 3-piece paperwork (photo ID, proof of address, and notarized USPS Form 1583).
Go to Settings > Authorized Recipients, and add a new recipient. Then click on the mailbox number, fill out the information, and download the pre-filled USPS Form 1583.
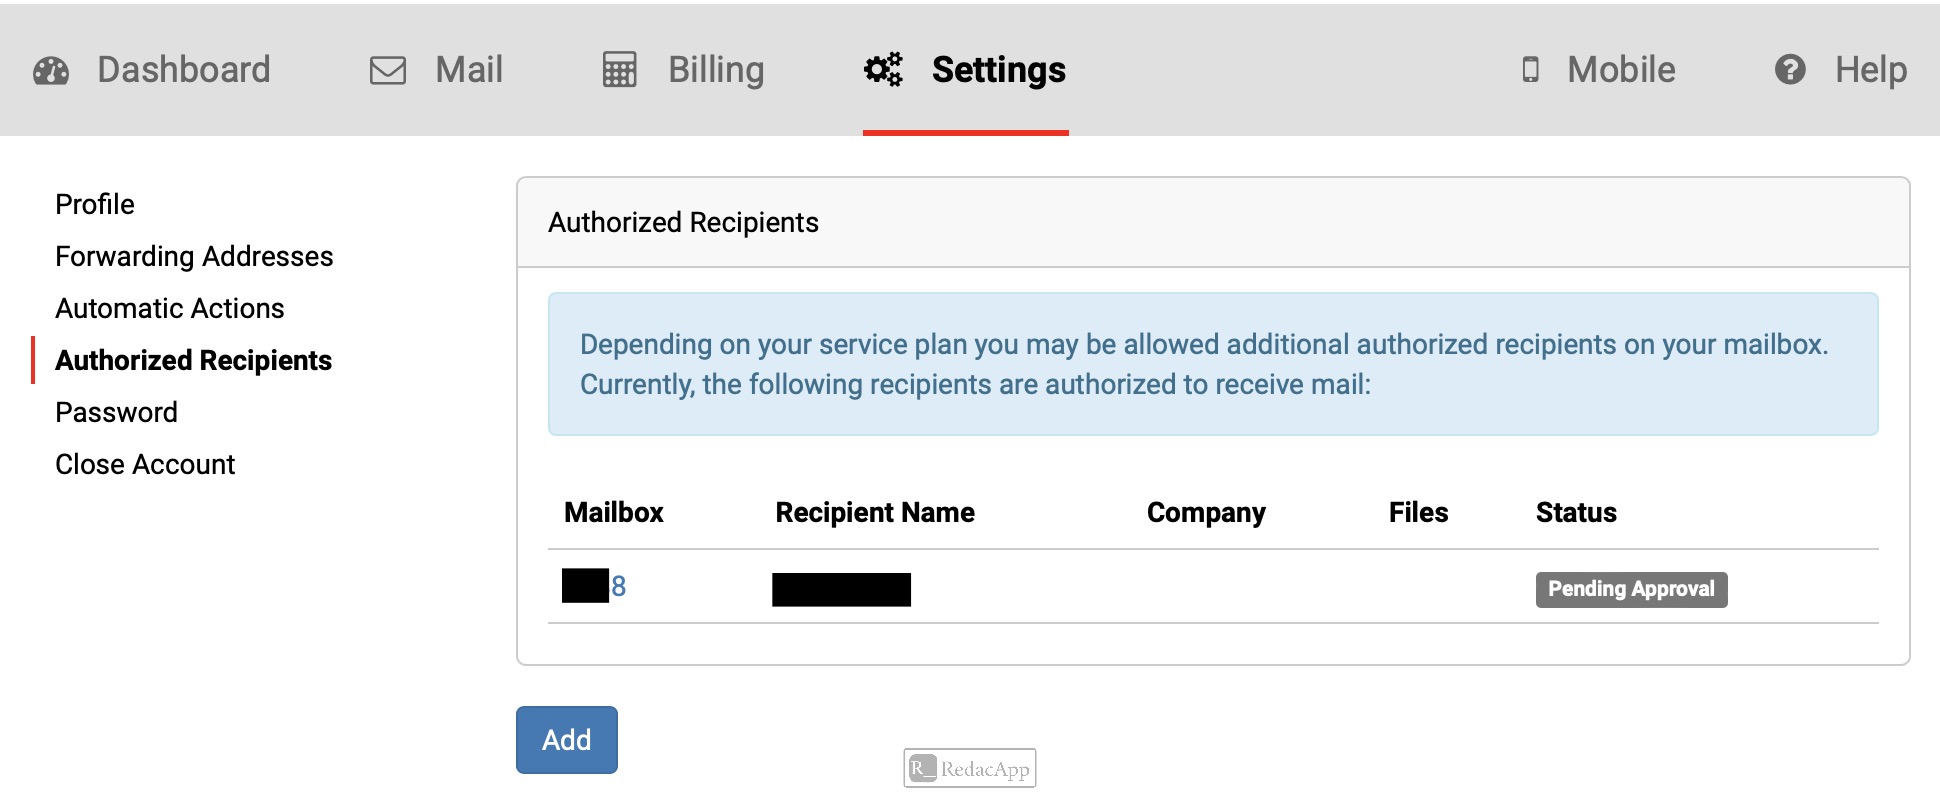 To an addtional recipient on Anytime Mailbox, go to Settings > Authorized Recipients, click Add. Once the recipient is added, click the mailbox number to get to the USPS form
 Click the button "Prepare USPS Form 1583" to download the form
(The user interface is confusing, honestly. If you are stuck, there is a chat box on the bottom right side of the website, where you can chat with a human agent, which is very helpful.)
Tip: If the pre-filled USPS Form 1583 does not work, download the form from USPS directly.
6. Set Up Mail Forwarding at USPS
- Go to https://moversguide.usps.com/.
- Fill out the form for mail forwarding.
- The old address is your original address. The new address is the address that is assigned to you at Anytime Mailbox, often with a mailbox number.
- Here is an example of the new address: 123 Main Street,Mailbox #456, Anytown, CA 12345, USA
- Pay $1.10 to verify your address and identity.
- The billing address of your credit card must match either of the new address or the old address.
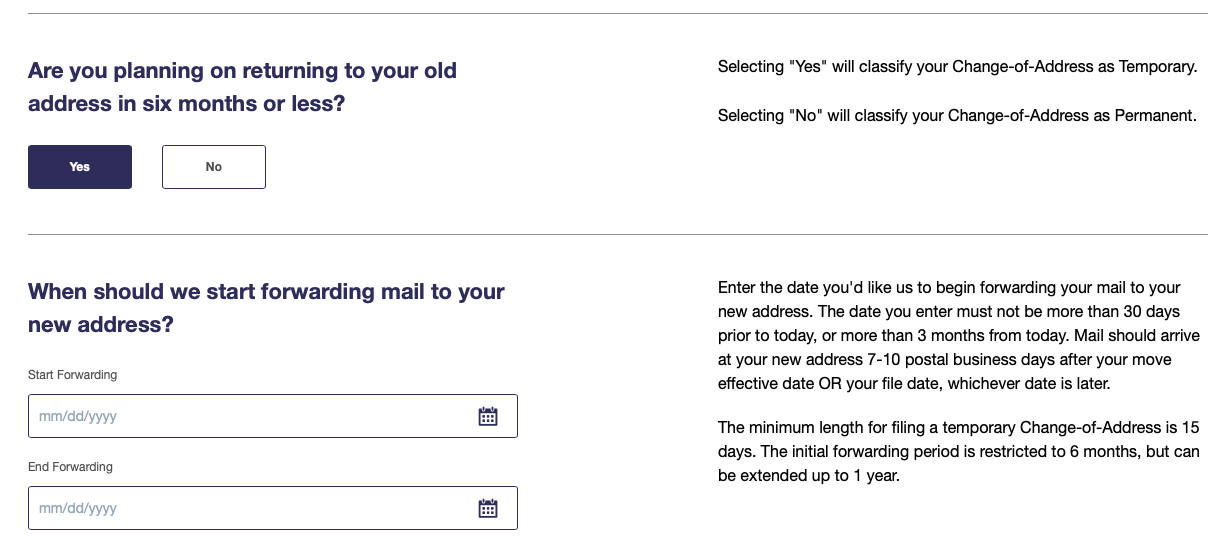 On USPS website, select Yes, if you are travelling for a few months
Pro-tip: If this is a temporary move, you don't have to set the end date of your mail forwarding to when you are coming home. Instead, set it to one week ahead of your return date, so you will start receiving mails right when you are home. This assumes you don't need to get the mails immediately for the last week of your trip.
Done!
Now, the entire Anytime Mailbox mail forwarding process is done.
Your mails will now be forwarded from USPS to a mail center of Anytime Mailbox. The operator will manage the mails for you. You can view the mails on the website or on their mobile apps of Anytime Mailbox.
Use Anytime Mailbox
Download Anytime Mailbox Mobile App
To manage your mailbox on the go, download the Anytime Mailbox mobile app from the App Store or Google Play Store. With the app, you can access your virtual mailbox, view scanned mail items, and perform various mailbox management tasks right from your smartphone or tablet.
Decide What to Open, Scan, and Shred
You will receive notifications for mails with the scan of the envelope. You can decide whether to open it or not.
Since there is a quota under your plan for scanning the content of the mails, you can decide whether to scan by judging the envelope. If you are sure it is a junk mail, you can request them to shred it immediately. If you are unsure, you can request them to open it for you.
Remember, the opening and scanning process is a manual action at the mail center, so there is a delay between your request and the time when it is actually scanned into the system. This is another reason why you need to find a reliable center.
Cancel Anytime Mailbox
After returning from your vacation, you can cancel your Anytime Mailbox by following these steps:
- There's no action needed for USPS, as you've already set an end date for your mail forwarding.
- Collect any paper mail from your mailbox that the Mail Center Operator has set aside for you.
- Close your Anytime Mailbox using the app.
Note that Anytime Mailbox charges for each mail pickup visit, so make sure to request all your mail in a single pickup request. Once your account is closed, any additional charges (pickup fee, storage fee) beyond the monthly fee will be charged to your payment method.
Conclusion
Overall, the virtual mailbox has been a lifesaver for me. It gives me peace of mind knowing that my mail is being securely managed even when I'm not able to physically receive it.
I would love to hear your experience of setting up a virtual mail box as well. Please feel free to comment.
If you find this article helpful and want to support my work, please consider using my promo code when you sign up for Anytime Mailbox.